Concept sketches (or schematic drawings) are drawn freehand by builders, or anyone else involved in design or construction. Their primary purpose is to quickly and simply communicate the main ideas and act as a guide; the design will be refined as the project moves forward. Concept sketches give information on the shape, size, construction, style and location of the proposed building. Though they are not drawn to a measured scale at this point, the sketches should be proportionate.
This pictorial representation of the builder's current understanding of the client's requirements also assists both client and builder to identify errors, omissions or miscommunication so the project can progress efficiently.
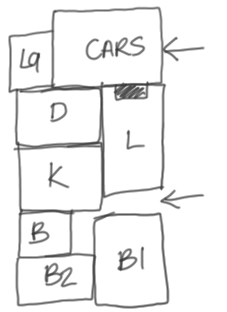
The very first (preliminary) floor plan sketch might be as simple as this example.
At the end of the concept stage the builder will usually produce three sketches like the following examples.
- Concept stage site plan sketch (PDF 700Kb)
- Concept stage floor plan sketch (PDF 552Kb)
- Concept stage elevation sketch (PDF 464Kb)
Drawing conventions
Although concept sketches are only drafts created at the beginning of the design process, they must still be produced according to accepted industry practice. In Australia this means following:
- Australian Standard 1100.101–1992 Technical drawing Part 101: General principles
- Australian Standard 1100.301–2008 Technical drawing Part 301: Architectural drawing.
Australian Standard® is the registered trademark of Standards Australia Limited.
These standards provide a common method for representing all the components of a building so that they can be consistently interpreted by anyone in the building industry. Drawing conventions include, but are not limited to:
- line type
- line thickness
- symbols
- lettering
- abbreviations
- layout
You will need to consult and become familiar with these standards to produce sketches and drawings for the building industry.
Hints for sketching
Sketches for the concept stage of a project should be clear and simple. Use as few lines as possible to convey the main ideas, and don't try to create a work of art or a photographic effect. Remember, these are only the start of the design process and there will be many changes to make along the way.
- Use a soft pencil, no harder than B.
- Draw each line in a single fluid movement rather than a series of short strokes. If it's not perfect don't worry, just keep going.
- Don't cramp your arm. Try using your elbow as a fulcrum to guide your drawing.
- Keep practising and try out different methods and different tools.